Labels

Showing posts with label Project Doc. Show all posts

Sunday, 15 September 2024

Final Documentary

This is my final documentary.


here is the link for the google drive, just in case the youtube video has problems:

https://drive.google.com/file/d/1sNhg5v4ZcZE2-vDlSLFQ5SwCcYssnR8S/view?usp=sharing


Thumbnail


Critical Reflection

This is my critical reflection for the documentary.

Questions:

1) How do your products represent social groups or issues?

2) How do the elements of your production work together to create a sense of ‘branding’?

3) How do your products engage with the audience?

4) How did your research inform your products and the way they use or challenge conventions?

Me and my team (Bagas, Nicho, Bagus) was tasked to make the opening of a crime documentary, around 3-5 minutes, for this project. We decided to based the documentary about murder and kidnapping, which in short, contains a story of a student called Bagus who was once a happy guy but later on, becomes distant and suddenly disappeared because he got rejected by his crush and wants to take revenge. Our purpose to make the media product is to raise awareness about murder and kidnapping and to highlight its dangers towards women and the people around us.

The research that my team and I did, tremendously helped us during the production of our work. From crime documentary opening research, thumbnail, and sound research, guided us so that we our documentary looked and feel like it belongs in the crime genre. At the crime documentary research, we identified and analyzed all common techniques that are often used in each of the documentaries. The conventions used for crime documentaries range from: dark setting, eerie music, dim lighting, random camera movement, and many more. These use of camera, mise-en-scene, sound, and edit ultimately lead to a goal which is to make the scene as suspenseful and make the audience be at edge for a majority of the time. For the thumbnail research, we took inspiration from the documentary ‘what Jennifer did’ and implemented the subject smiling and the subject frowning for our thumbnail. We also use the red to color the word ‘good’ because red has connotations of blood, and danger which is perfect for a crime documentary that revolves around murder. Furthermore, we specifically color the word good because we want to implement reverse psychology as good implies that it’s a positive word but after what Bagus did, the good turned red meaning something terrible had happen such as a murder. We choose this because based on one of the 5 codes (hermeneutic code) made by Barthes, it creates a sense of mystery and hooks the reader on the possible reasons that made Bagus change from the positive to the negative side. Furthermore, we use color white and black as the mise-en-scene to differentiate the good (being white) from the bad (being black). Also, based on the culture code made by Barthes, we decided to use the title “Not so Good” because our subject’s name, Bagus, is a word from the Indonesian language that means ‘good’ and we thought of the idea to make the connection so that the title is related to the documentary.

I choose an audience by identifying what resources we had as 4 teenagers who was tasked to make a crime documentary. For example, our resources was the availability of Indonesian people that were around us and I could make them our actors instead of hiring professional ones. This logically led to choosing Indonesian people as our target audience but we also decided to include foreign people as well so that more people can enjoy the documentary. After choosing an audience, I intentionally design my media text to appeal them such as using Indonesian slang (like ‘curhat’ which means deep talk) to make the Indonesian audience able to relate to the film thus making them more engaged. On the other hand, a way to target the foreigners was to edit in English subtitles so that they can understand what is being said - without them learning the Indonesian language.

The groups that were represented in our documentary were young Indonesian students around the age of 17, that are both male and female. The group contains the main subject (Bagus), the girl and Bagus’s friends. At first, Bagus was shown in a good light because his friends said (through the interview which is considered as diegetic sound) that he was a great and kind guy which is also paired with positive mise-en-scene such as using silly pictures/videos of Bagus’s past which connotes that he was an unserious person. But then he changed to a mysterious, and anti-social type friend and this was shown by his friends stating it during an interview that is dimly lit, expressed in a flat tone, and the interviewee using dark clothing to further express what they’re stating are the negative side of Bagus and showing hints that he is connected with the disappearance of another student. This is done so that there’s a plot twist in the documentary that drives the narrative forward. Then, the girl is shown as innocent and classified and this was represented by camera angle showing every part of her but her face which implies that the producer of the documentary is trying to protect her privacy. Also, Bagus’s friends were represented as side characters by them being interviewed (which is what side characters do in crime documentaries) and their purpose is to give context of who Bagus was as a person and foreshadow an incident that involved the girl who rejected him.

Since we target the 17+ year old Indonesians and foreigners, our preferred reading about them is that different people handle rejection differently and thus it is unpredictable to know how they would respond in that situation. Additionally, a stereotype was used in the form of a person would get sad when they get rejected and in this case, Bagus got depressed, distance himself from everyone, and for a while, locked himself in his room before he started his plan for kidnapping. This is because stereotypes help to make audience understand the context faster without wasting any more time. It is also a way for the audience to relate to the media text, making them more engaged. Also, another preferred reading is that boys are naughty, troublesome, and defiant as even when things doesn’t go to their way, they would find a way to take revenge and get the last laugh (in this case, Bagus got rejected, kidnapped the girl that rejected him and took her life as payback but he was so insane that he took his own life too). However, the preferred reading for girls is that they are innocent, and often the victims.


Saturday, 14 September 2024

Sound/Music Decision

This is our decision for choosing the music (this blog post was made by Bagas)


As for the music I chose, I based of mainly from youtube. However before I started finding the music I asked our teacher if I  am allowed to use copyrighted music or not. since most of youtube's music is copyrighted.


To start, I optimized youtube's search engine by typing "suspense music background". This was the link to the playlist I found. 

https://youtube.com/playlistlist=PLyiH5bnBV4URC5DpBmofjOfdGQ0Af_WL2&si=_u2tFxfDP4qoBtlo

Though the one I chose was :
https://youtu.be/NWaNW-aYhVY?si=Es38DtAhAHCDvn5q

The build up of suspense in the music I think was a perfect match for our plot. Since we started of with a not so suspenseful atmosphere we didn't want to hit the audience with an instant boom for music as it will become boring and too monotone. As the music crescendo's, the suspense increases. I think this slow build up makes the documentary have more energy to it, it builds anticipation and creates the ominous atmosphere. As the documentary opening reaches the end the plot becomes darker in a way it starts to become more serious,  synchronized with the music, I think will successfully build the suspense me and my group want to create. 


For the beginning, it doesn't need to be suspenseful because we wanted to create a memorical/dramatic moment as the interviewee describes their moments with Bagus. Therefore I asked my teammates their opinions towards multiple songs and we all agreed on this background music. The slow rhytm in the music allows the audience to breathe and connect to the interviewees. The music also uses instrumental music such as a piano that tends to evoke a sense of calmness.


Self Reflection:
This sound decision made the documentary sound more interesting and suits the crime genre. The difficulty for this was choosing the right suspenseful sound that match our video. One of the feedback that we got from our teacher was that the build up was too stretched out - making it not effective. So to change this, Bagas search for a suspenseful build up that takes less time to reach its climax so that the sound keeps the audience engaged. A way I contributed was to suggest which eerie audio match the video the best so Bagas could edit it into the documentary. Next time, I would ask my teacher on what he thinks about the sound choice and he could potentially give us better source of audio which would make the video more professional.


Thursday, 5 September 2024

Thumbnail Research + Development

This is the thumbnail research (that Bagus made) and development (that Bagas and Nicho made) for the crime documentary.

RESEARCH

Typical general conventions of documentary thumbnails

Mise En Scene
  • They typically have a darker vibe, with shades of red and black which correlates to negativity, in this case, the colour red correlates to blood, which humans bleed when they get hurt or murdered. While black correlates to general negativity, this is done usually for the backdrop of the thumbnail, and the background and base colours of the thumbnail. 

  • They either used an establishing shot of the crime location as the picture of the thumbnail, this is used to further add suspense and gives the movie a chance to hook the reader on so they will be wondering if that location actually relates to the real crime or is it really where the crime happened, which makes them watch the whole movie. 

  • Most of the time, documentaries use a picture of the victim/perpetrator in order to give a direct hint to the viewer who was involved. Still relating to the topic of colour, documentaries usually colour grade their faces to be black, or dark. In order to correlate to the aspect of crime and its negativity. 
Camera Angle

The common camera shots used in the thumbnails would be
  • Close ups, often used to close up to the characters in order for the viewers to focus on the main subject (usually the culprit or the victim), these can often use the main facial expressions of each character that is involved in order to set the vibe and tone, 

  • Establishing shots in order to give the sense of setting.
Edit
  • Split screen images to directly associate victim and culprit.

#1 What Jennifer did. 


Mis En Scene
  • Happy picture of Jennifer on the left side, this is in order to show her persona, her happy self that she portrays outside. The expression also brings a good vibe to her name in this case. Here, she looks neat and she has a proper make up. Which shows her positive side

  • In contrast, a bad/ugly mugshot of Jennifer was used, this implies that she also has a bad side, her hair all scruffy, her face unhappy and unneat, all contributing to the suggestion that this is her other side. A bad side

  • Red filter was used on her bad side in order to enhance the aspect of negativity on her bad side. This also enables the viewer to somewhat guess what happened, as the colour red connotes blood, murder and death. And in this scene, death happened, murder happened, blood happened
Camera Angles
  • On both sides, a closeup is used in order to shift the viewers focus on the expression of each picture. This will help viewers get the vibe of the thumbnail. And it can let the guess and hook into the documentary to catch on what actually happened. In this case, the close ups helped zoom in the positive smile of Jennifer (Her Persona) and the mugshot (the reality)
Edit
  • The split screen is used in order to create the impression of persona and reality, this helps to make the viewers know that there were two sides to the story, that not all smiles are genuine and pure, and some, “angels” could be devils. 

#2 American Murder: The Family Next Door

There are multiple versions of the thumbnails, but i will analyze each based on their similarities


Mise En Scene (First Thumbnail)
  • For the first thumbnail, they intend to be vague in their production of their thumbnail, as they use an EKG machine reading that shapes into a house in the end, with red colours, firstly, this EKG scale is used to show what was once life, turned into mystery, the houses are used to symbolize the crime happened in some couple of houses. The colour red connotes death and blood, which will give the viewer a clue that death is involved, this also builds up mystery and suspense as viewers are left to solve the mystery, by watching the movie. 

  • Semi bolded words are used in this thumbnail to give the sense of strictness, stiffness and mystery to the viewe
Camera angles
  • The only specific shot is a close up shot, which focuses on the key mystery making of the movie through the thumbnail.
Edit
  • There are no specific edits in this thumbnail extract. 

Mis En Scene (Second Thumbnail)
  • For the second thumbnail, the thumbnail producers decided to use the blurred out picture of the convicted killer, Chris Watts, this conforms to the typical conventions of crime documentary thumbnails as they use the killers’ picture in theri thumbnail. This is to give a direct clue to the viewers to keep them guessing and asking the question, “is it this guy in the thumbnail who did it”, this also creates the sense of suspense and mystery. 

  • The use of red. Bold fonts are also used, this also conveys to the typical conventions of crime documentaries, the red colour of the font connotes again, murder and blood, the bold makes the scene more serious. 

  • Conclusion, red+chris watts= direct clue of chris watts being the murderer.
Edit
  • There are no specific edits in this thumbnail extract. 

#3 Ice Cold: Murder, Coffee, and Jessica Wongso


Mis En Scene
  • This thumbnail somewhat conforms to the typical genre conventions of crime documentaries, as it uses the picture of the alleged perpetrator (Jessica Wongso), again, this is in order to give the viewer a sense of interest and a direct hint, “what is the correlation of this woman and the case’ (suspense, mystery, questioning)

  • There were cropped shots of newspapers and article headlines. This gives the reader the idea that this case was famous, and they can’t miss out on this documentary and they have to watch it. 
Camera
  • In the snippets of these newspapers, there are various close ups of the articles in the edit. This shows a sneak peak of the newspapers with the words visible and can be readable, from here, the audience can get a clue of who was involved, with small details of the story being spilled out which hyped them up, they felt that it was appropriate to be watched. 
Edit
  • They have used split screens in order to get the subject in one room with the newspapers at that time. 

#4 Worst Roommate Ever, 2022


Mis En Scene
  • This thumbnail really conforms to a crime documentary as they use a presumably unneat man with unneat brows sneaking through a door and peeking. The act of peekoing is usually connoted with stalking, being a creep and basically invading privacy

  • The kind of beat up wooden door suggests that this may be set in an old setting or old house, or that this is a horror house, but it seems not. 

  • Thorough words, they bolded white in order to make it way more serious and direct to the reader and it can make them ask the question, “why is he/she the worst roommate?”What did she do?, this really helps bring suspense to life with just a picture
Camera Angle
  • They use an extremely close up shot, hiding the rest of the face and body, firstly, this scares the viewer as you don’t see an eye peeking at you everyday as a thumbnail. This can give them that negative/positive feeling in the cinema. Which creates a new trend and keeps them attached. 

  • Secondly, the hiding of the face and other parts of the body may connote to the fact of hiding something and not being honest. 
Edit
  • There are no credible edits worth to give effect. 

#5 Crime Scene: The Vanishing at the Cecil Hotel


Mise En Scene
  • The bell has an extremely spooky shadowy figure in the middle, this creates a feeling of unease which conforms to the typically dark and mysterious genre conventions of crime documentaries. This figure also will get the viewers questioning, “does this figure have something to do with the disappearance?Is she the one who disappeared?, these questions can make them hook on to the documentary searching for the outcome

  • In the background, the blurred "Do Not Cross" police tape and flashing lights connotes and suggests danger, crime, and urgency. This layer makes the crime scene aspect more tangible and is able to spark a good amount of curiosity about what exactly went wrong at the hotel.. And as usual, the presence of police conform to the genre stereotype of crime documentaries.

Camera angle
  • The low angle and closeup makes the bell seem strong, this basically says that this bell has a massive role and presence in this documentary, symbolizing the importance of the hotel in question as bells=hotel lobby. It also immerses the viewer into the environment.

Edit
  • Dark colour grading really conforms to the dark natured genre stereotype of any crime production. This is to give a sense of negativity and suspicion to the eyes of the viewer, which can make them suspect that something has happened. 

  • Blurring of the figure in the bell, this really adds to the element of suspense as this makes the viewer wonder who this person is blurred in the bell and what is her correlation. 

DEVELOPMENT

This will be our development for the thumbnail including our improvements and the challenges.


Making the thumbnail was quite challenging as this was our first time creating this type of project. Our research turned out to be quite useful as we used them as guides on how to make a documentary thumbnail with the genre of murder. 


We made a total of 40 drafts for our thumbnail. This is too much to choose from so we shortlisted and nominated 4 of the most developed thumbnail ideas and the final thumbnail for our documentary. 


1st Draft


We tried to make our thumbnail using inversed colours such as green and red. This is made to show how our actor has 2 sides and implement this meaning to the audience. The inverted colours should also make the audience feel eerie and disturbed as the colours aren't the usual colours that would be used by anyone when making a thumbnail. 

2nd Draft


This time we changed the color for our documentary to make things seem less eerie. We would also like to show how Bagus, our main character is a nonchalant guy who undergoes catalysts making him a different person.  In this documentary, that case will be about shampoos. I don't know how but we will work it out eventually. The colour of the fonts is also similar to how it should look and according to our first draft, the title scene should not be that long and difficult. 

3rd Draft


For our 3rd draft, we just decided to use grey as the inverse of red to show how surprised his friends are. Instead of black, we made the ‘not so’ coloured white as it would be necessary to show that the left side of him is his happy side. The colour white connotes peace and freedom which was what Bagus was, his rejection changed all of his behaviour making him look even more bay. 

4th Draft


For this draft we made Bagus’s face half blurred to make it seem more mysterious and imply to the audience that there is something wrong with him. We wanted to make the audience think he isn't his normal self and something in him changed. This is not our final thumbnail as we made some changes to the final one. 

Final Thumbnail


Our research conducted things that we could use for our documentary project and this is the final thumbnail we chose for our project. This thumbnail we believe represents our actor’s negative side and positive side ensuring the meaning we wanted to imply to the audience is more reasonable and makes so much more sense. We decided to not make both pictures side to side but instead made them on opposite sides.Self Reflection:
The thumbnail research gave me and my team a general idea of how crime documentary thumbnails look like thus giving us inspirations so we can implement elements to our thumbnail. The thumbnail development was the process of us experimenting on making many different possible thumbnails that we would use and it acts as a method of feedback that we could get from my teacher and other friends. For the development, I gave my opinion as my contribution such as suggesting that the other half of Bagus’s eyes should be blurred out because it connotes that he did something bad recently. The problems that we encountered was that we didn’t know how to format our thumbnail, what colour to use, and the type of font. So to solve these, we just kept making more, until one looks decent, but then it didn’t meet our expectations so we asked feedback from our teacher. When assisting Bagas and Nicho on the thumbnail development, I’ve improved my creative skills since I had to come up with ideas on how to make the thumbnail more eye catching. In the future, I would ask more feedback from my teacher and friends so that I could receive more suggestions early on, so that the end result will look it’s finest.

Editing

This is the editing process (that Bagas made) for the crime documentary.

Pre-Editing

Since the shots we took were using multiple phones, we as a group decided to make a google drive to easen up the collection process and so that we could review all the clips at once. This also saved my storage space within my phone as it was nearly at its limit, as all of the footage combined was around 6 Gigabytes while my phone was only capable of holding another 2 Gigabytes.  


At the beginning of the week , when this project was introduced, I was confident that I could learn editing software within these months for this project. Davinci Resolve is an editing software that I chose at first.  This was very new to me, usually I use my mobile phone to quickly edit things but since this is a big project I may want to switch over to using a desktop software. However, a huge problem was that I didn’t manage my time well, therefore I didn’t have enough time to really explore and dig deep into the application. Hence, as time was ticking and the deadline got closer I decided to switch over to capcut on my mobile phone. As I do have experience editing using this software. 

Editing Process


The first step I did was laying out all of the clips in order of the script, person by person. After that I matched up the audio with the correct clip and syncronized it with their lip movement. This is because we had a mic issue, the issue was not having an external mic, so we decided to use another phone to record the audio. The way I did this was by extracting the audio from the video itself, this is a cool feature I discovered in capcut while editing. Then I added pictures between the conversations, using things such as slideshows or screenshots of Bagus to make it more authentic and realistic. This feature of a crime documentary was also found in my research, the use of real life evidence . 

Then I added finishing touches such as effects, for example the flashback I added a black and white effect that connotes Bagus’s hopelessness after the rejection. Increasing the dramatic effect. Another effect I added was vignette, this was to increase the focus towards the interviewees . The dark edges create a sense of claustrophobia which makes the audience feel more uneasy. 

As well I added a blur effect towards the ending with a fade in transition as the flower drops, this is to make the audience anticipate on why the video was obscured and make them have to watch more to know what happens next. 


Lastly, I added the subtitles for the videos. A reason why I did subtitles last is because If I wanted to adjust the clips, for example moving the audio forwards or backwards I have to push every other clip. This is because, to my knowledge, capcut doesn’t have a feature that allows clips to stick to their audio or effects. Hence it will be a hassle to adjust everything again when it's already in place. Therefore doing subtitles last would be the most efficient way to finish the documentary. 

FEEDBACKS GIVEN


A feedback we got from our teacher was that during a high angle shot when Nicho came out, the bed was in the shot making it not suit with the other clips. Therefore a solution we got was adding a split screen feature and cropping the clip so that the bed will not be showing. The other side was then used as a slideshow to show Bagus’s pictures. We as a team decided to keep this change by our teacher as we needed a way to put more pictures in the documentary, and this change helped us add more pictures.


Another feedback we got is the diegetic sound of the light turning off during the book closing scene. My teacher advised us to use the same sound effect for the light switch noise, we realized this was a problem as it made it as if the place was in two settings. In the end we were satisfied with this change as it now connects with the whole scene. 


Lastly we got feedback about the ending. My teacher recommended putting a picture or video behind the text in the end, because the background was pure black. By adding the video in the end, eventhough it was blurred, it helps build the suspenseful mood making the text seem more ominous. Therefore we decided to keep this change.


Self Reflection: 
The editing done by Bagas completed the whole documentary and made it whole. From the addition of non-diegetic sound to add suspense, the sequence of how the scenes are ordered; and adding elements such as vignette to further increase the tension made the overall documentary conform to the crime genre. My contribution to the editing process was to suggest on implementing slow motion to the falling flower to connote that scene was important to the plot of the film. There were also difficulties such as creating the subtitles for each shot since it’s the norm for most or not every documentary and it was very time consuming to make. So to lighten up the burden, Nicho helped by telling Bagas what to write and Bagas would just listen and edit in the subtitles, instead of multi-tasking. Next time, I would suggest Bagas to edit in his laptop so that he has more editing resources and tools available, thus resulting in higher quality edits and overall, improve the documentary.


Behind the Scenes

This is the behind the scenes for the crime documentary (that me and Nicho made)

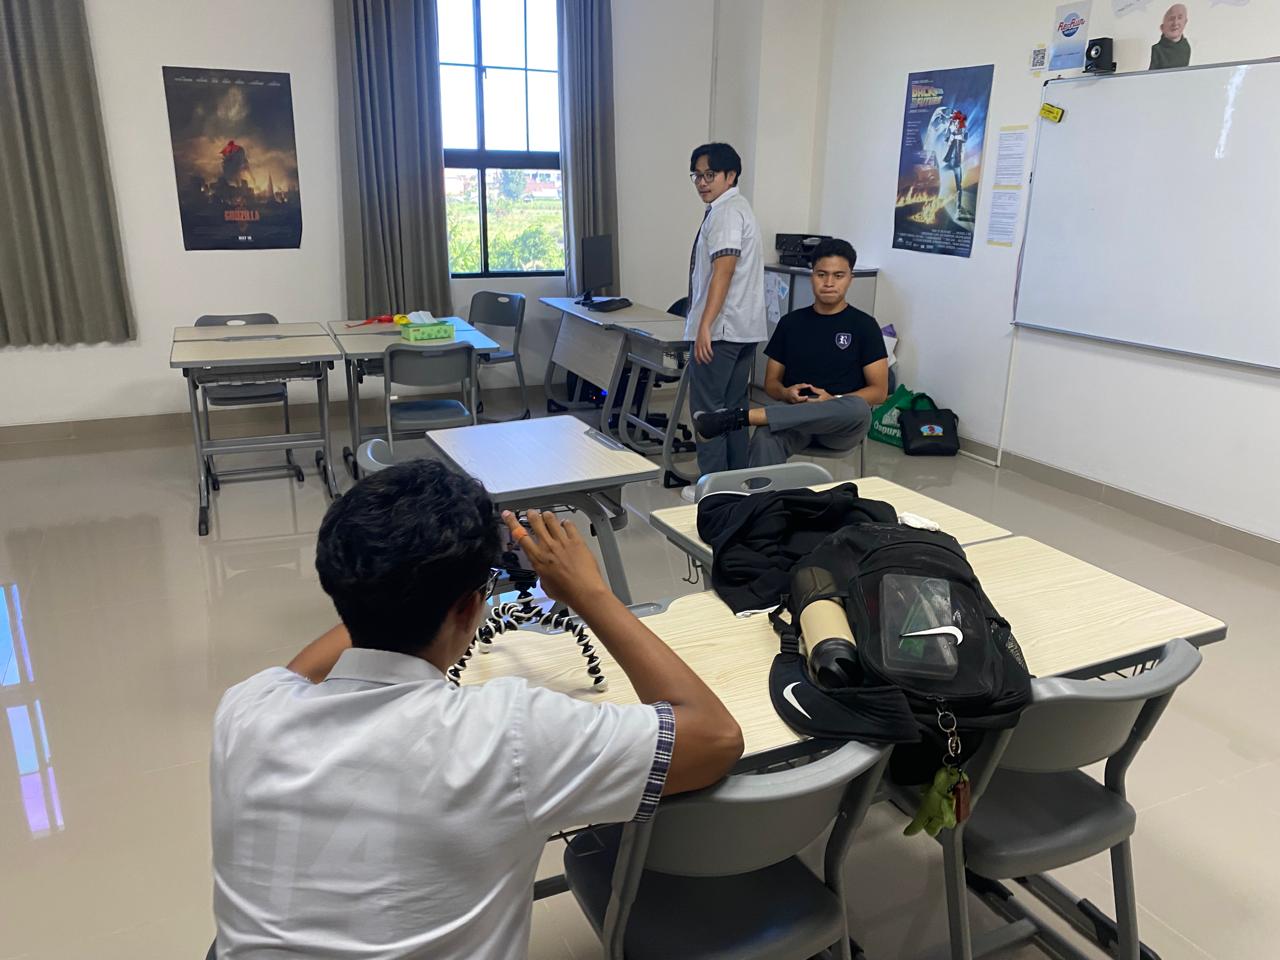
#1 Setting up camera angle before recording

Problems: We had difficulty finding the most suitable spot in the classroom to film the interview. There were many items in the room which do not conform with our mise en scene requirements, as can be seen in the picture above, there were loads of posters and colorful decorations on the wall. If it were in the background, it would make the interview less serious and we didn’t want that to happen.

Solutions: We did trial and error by taking pictures of a person sitting on a chair at many different parts of the classroom. Then at the end, we compared and saw which one looked the best. After we find the optimal spot, we use that for the interview.

What we changed: We changed the positions of the tripod to find the best appearance-to-angle ratio so that the interview looks proper.

What we kept the same: We used the same phone to record the scene so that the aspect ratio of the camera doesn’t change and to save time. 


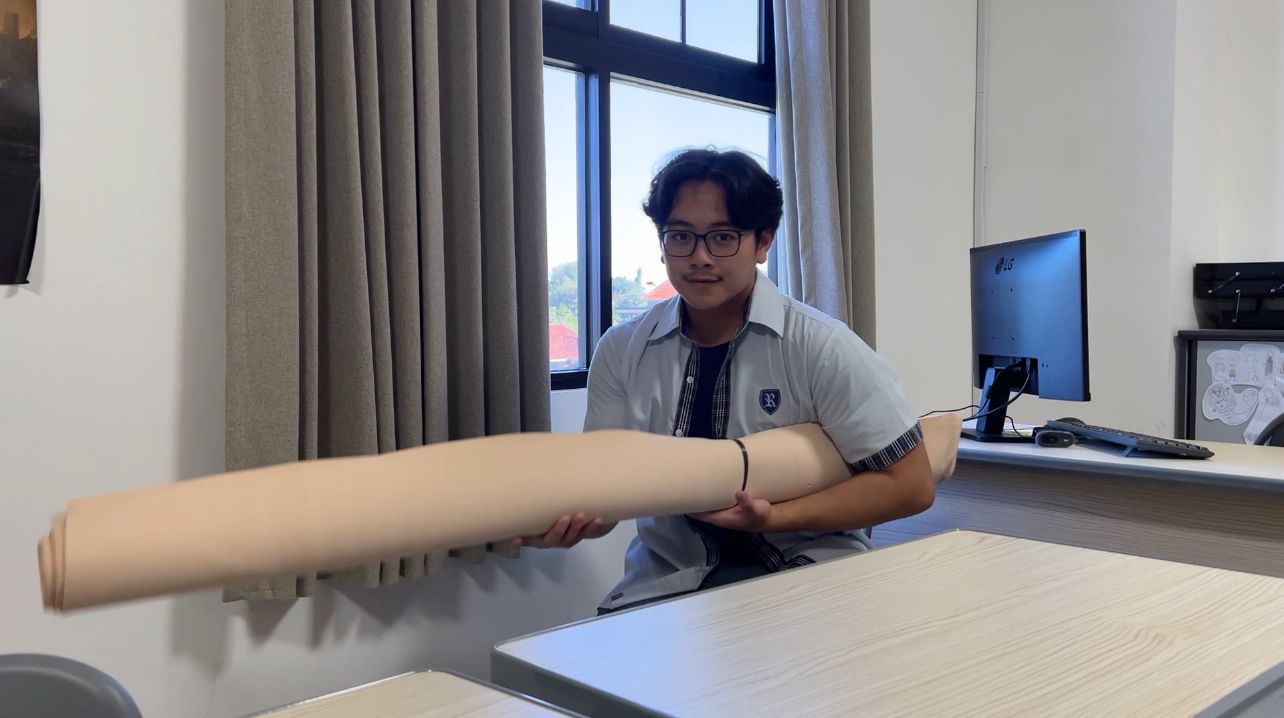
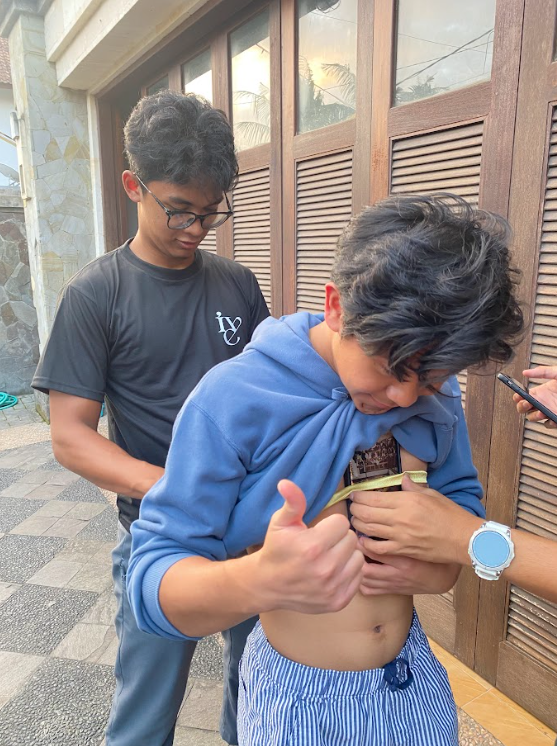
#2 Setting up the microphone to get clearer audio


Problems: When we were about to record another interview at my friend’s house, we ran into a problem setting up the mic since we couldn’t put the phone near the actor. So we had the idea of tying the phone to the actor’s body and hiding it under the hoodie. However, the phone kept sliding down and we had to stop the recording for us to tie it again. Also, after we recorded, the audio was a bit unclear and there were ruffle sounds caused by the hoodie.

Solutions: To solve the problem, we had to tie the fabric tighter so it doesn’t fall anymore and lift the phone higher up so it captures the actor’s sound better - which after we checked, this change made the audio clearer.

What we changed: We changed the tightness of the fabric so the phone didn’t move and lifted the phone higher.

What we kept the same: We used the same phone to record the audio so it’s all the same quality thus making the interview sound more consistent throughout the documentary.


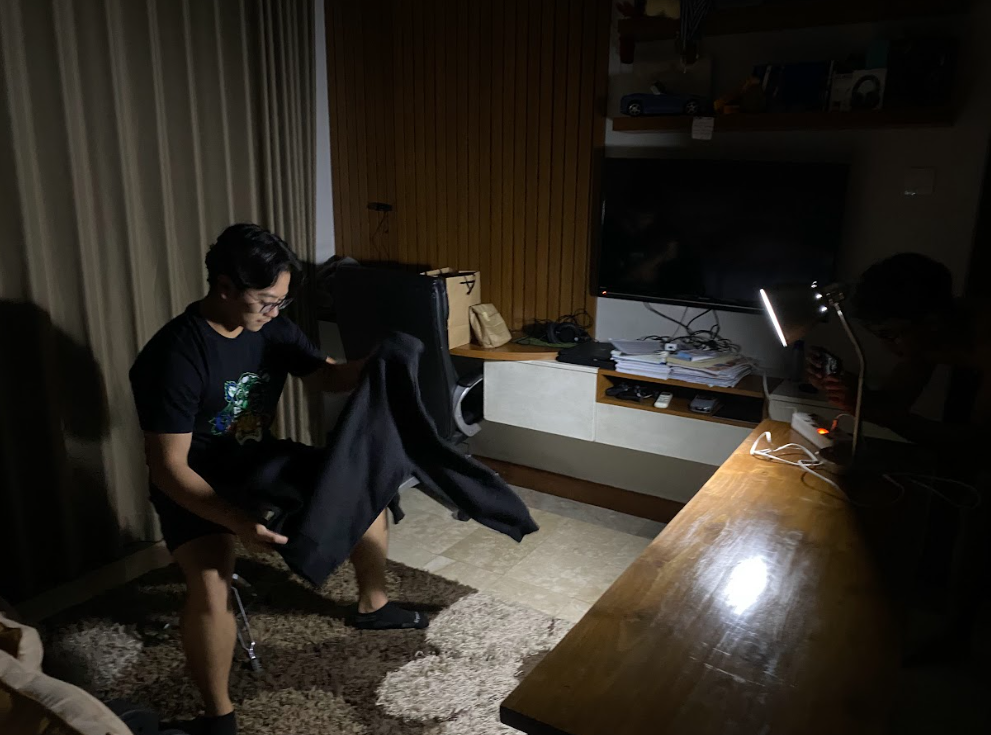
#3 Arranging the lighting and prepare the props before the interview starts


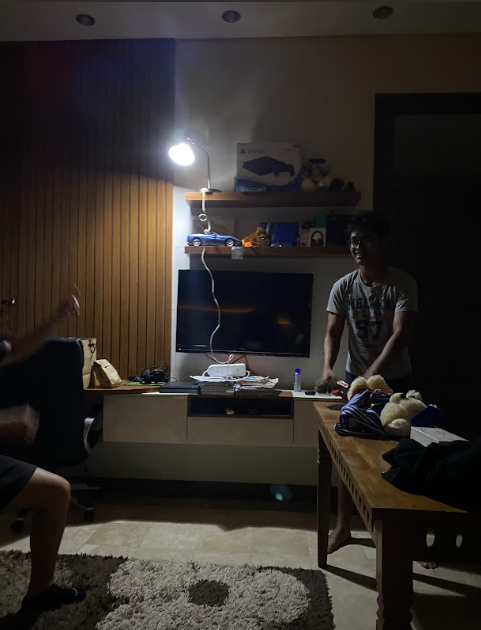
Problems: We didn't have professional tools that could help us with lighting such as ring lights and studio monolights that are typically used for shooting professional documentaries, making it harder for us to record a scene with the preferred lighting. Although we found a solution, the lamp we found was kind of broken as it likes to shut off randomly, making us reshoot a couple of times.   

Solutions: We instead use a study lamp we found around the house of one of my teammates. The solution to the second problem though we didn’t think of any as all we needed was luck and hope to make sure the lamp wouldn't turn off at random times. We did try to use a flashlight as a replacement but it turned out to be less effective as it isn't as bright as the study lamp we found. 

What we change: We change the position of the lamp several times but end up placing it on top of the shelf. This is because we wanted a rather dark mise-en-scene for our documentary to make the audience feel more confused and add mystery to our documentary as dark lighting connotes that something bad is about to happen. 

What we kept the same: For what we kept the same, we told the subject to sit in the chair and told him to face the same direction while we recorded him in many different camera angles (such as high angle, medium shot, and low angle) 


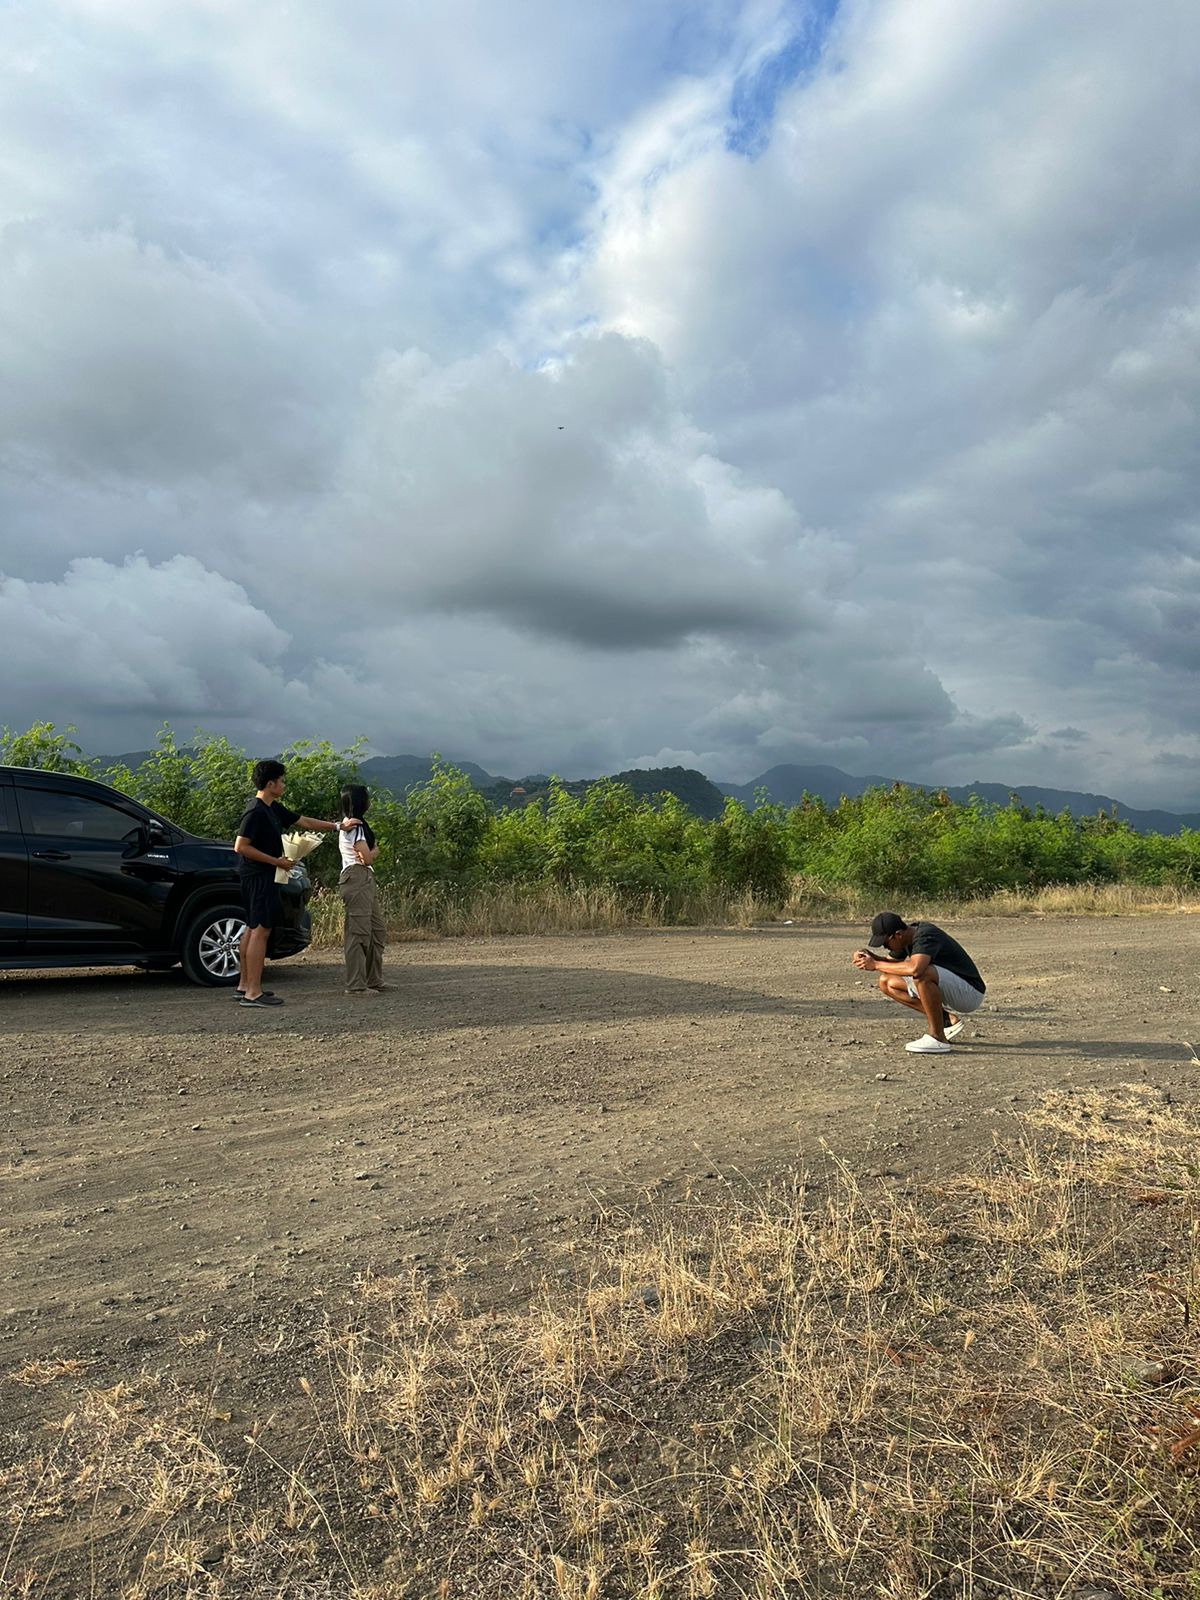
#4 Recording the rejection scene


Problems: Shooting this scene was quite challenging as we couldn’t control the weather and the lighting of the sun. Another problem was that we didn’t bring a tripod to stabilise the camera movement so the result was slightly shaky and tilted.

Solutions: We went somewhere less crowded, near the location, so there is less chance of being disturbed and so we didn’t have to retake as much. For the scenes that were slightly tilted, Bagas (the editor) decided to not use it since it wasn’t as important as the other recorded scenes, in the rejection section of the video.

What we change: We changed the angle a couple of times to get the lighting we wanted which was brighter as it was a proposal scene. The lighting would change the encoded meaning of the scene and our goal is to create a happy atmosphere. The weather was changing frequently and we needed to change spots several times making this location very challenging to use.  

What we kept the same: Following the storyboard, we decided to keep the positions of both actors the same and gave emphasis on the flower falling down to show that Bagus got rejected. 


Self Reflection:
When me and my team record the documentary, me and nicho took behind the scenes pictures and analyse what problems arise, our solutions to resolve those problems, what we change and what we keep throughout the recording. For examples, the problems we encountered was bad lighting during filming, bad quality audio, unwated background elements, and many more. This made us improvise on the go and did many trial and error to find the correct way to fix it. So we implemented solutions such as moving the lamp to another locaiton, tie a phone onto the actor to get clearer audio and move to a more suitable location. Solving these problems help improve my critical thinking and communication skills because we had to think outside box as we had limited resources to deal with (such as the lamp situation, where we put the desk lamp ontop of selves to get better lighting on the subject because we didn't have studio lights), Next time, me and my team should preferably invest on better equipments such as a studio camera to get better quality recordings and small hidden microphones, that we can attach to the subject, so the audio is higher quality thus making the documentary sound professional and have more clarity.

Script + Storyboard

This is our script (made by Bagus) and storyboard (made by me) for the crime documentary 

Script

Synopsis: A teenage boy (Bagus) has been having strong feelings for his best friend,  a girl named (Anargya), after a good long friendship. He decides to finally let go of his feelings and plan a confession, but it did not go his way. From then on, his life took a sharp turn. He disappeared mysteriously, friends worried, teachers worried of his disappearance 


ORDER OF ACTORS IN ORDER OF WHO APPEARS FIRST IN THE OPENING


Friend 1: Saka

Friend 2:Louis

Friend 3: Nicho


(SAKA SITS DOWN AND FACES THE CAMERA)


Interviewer: What do you think of Bagus?


Friend 1: What do I think of Bagus? He is a very close friend of mine, he is a happy person and he is fun, he is everyone’s friend and he is very kind. He was always by my side whenever I needed him and he was a very kind guy. 


Question: Regarding the things that happened, would you mind explaining the aftermath?


Friend 1, Saka: There were some side effects, he was a shell of himself, did not open up to anyone and even locked himself in his room. Recently also, this girl Bagus had an interest in, she also disappeared, her friends were worried about her, up until the point that her mom tried calling the school. There was zero response. 


Question: Are there any questions that arise?


Friend 1, Saka: Yeah, I personally question if their disappearances are related, you know, does this rejection have any correlation?


(LOUIS SITS DOWN AND SMILES AT CAMERA)


Friend 2 Louis: He was really one the nicest guys i’ve ever met, I talk to him everyday? Mostly everyday?Almost everyday?I mean, I try to talk to him if he cooperates, he is very hard to talk to some day. But regardless, he is a very happy guy who brings everyone a smile, to me as well. A literal sunshine. But recently, he’s been acting a bit off lately…


Interviewer: Do you think that there is a correlation in their disappearance?


Friend 2, Louis: You know, I think both of your disappearances are very sketchy, I'm just wondering if you had anything to do with that?, or did she have anything to do with that?


(NICHO APPEARS, LOOKING SERIOUSLY AT THE CAMERA)


Question: Who is Bagus to you?


Friend 3, Nicho, (In full Indonesian): Nama saya Nicholas Gilbert Limardi, saya adalah teman baik dari Bagus, kalau menurut saya Bagus adalah orang yang sangat baik, dia orangnya sangat friendly, reliable juga disaat perlu bantuan, dia selalu ada. Kadang juga dia orangnya sangat menyenangkan, dia sering curhat ke saya, menceritakan masalah hidupnya, kalau dia ngejar cewe juga biasa dia bilang ke saya, kalau gagal pun dia bilang ke saya. 


(Translation: My name is Nicholas Gilbert Limardi, I am a good friend to Bagus. In my opinion, he is a very nice guy, very friendly and reliable. Whenever I needed help he was always there to assist, with that, he is also a fun person. We talk about deep topics a lot and he talks about his life problems. He also tells me everything regarding the girls he likes, and if he gets rejected he also tells me.)


Interviewer: What happened recently, do you want to tell us about it?


Friend 3, Nicho, in full Indonesian: Kebetulan baru- baru ini Bagus kena tolak, setelah penolakan itu, bagus mulai berubah, senyuman yang biasa dia pakai ke sekolah sudah mulai menghilang, keceriaan di dalam suaranya juga sudah mulai memudar, dia juga sekarang sudah jarang muncul di sekolah. 


Question, Nicho, in full Indonesian: Tapi menurut saya, kehilangan dia dan kehilangan Bagus, pasti ada hubunganya. 


(INTRO END, ENTER TITLE)


Storyboard

Shot 1-4


Shot 5-8


Shot 9-12


Shot 13-16


Shot 17-20


Shot 21-22


Self Reflection:
The script helped the actors (me and Nicho) know what to say in each scene. The storyboard was useful for assisting in visualising what the opening documentary would roughly look like. For the script, I gave suggestions of what I would normally say so that I don't have to improvise alot of my lines. A problem that I encountered was that I had difficulty to embed my script into my blog post (because when I tried to do so, there was so many lines of code that I don't know what to do with it). So to solve it, I just copy and paste the contents and move on with it. The skills I improved was my improvising skills since I'm not the type of person to 100% remember their lines so I improvised and tried to act like I was having a normal conversation with someone. I also developed my confidence since I'm not used to talking infront of a camera so that was quite challenging for me, however after a few retakes, I started to feel more sure of myself and just did it. Meanwhile, while making the storyboard, I had difficulties thinking about what scene would come next and thus result in taking way too much time to finish it. However, it was worth it since all of my team members could visualize the chronological events of the documentary and they could record it based on the storyboard. In the future, when making the storyboard, I would just roughly sketch the scenes and give more detail once the quick sketches was all done.

Tuesday, 20 August 2024

Filming Schedule

This is the filming schedule (that Bagas made) that will help us organize when and where we plan to film the crime documentary.


Self Reflection:
The filming schedule was meant to helped me stay on track of what to do on a particular day, however, in reality, me and my team went off schedule and didn't do the interview and filming on that date. This is because we were quite busy with other tasks from other subjects, leaving us no time to get together and record the scenes. A solution to this was, communicating through our Whatsapp group to discuss when each of us is free and schedule to meetup then. I contributed by suggesting what day is the most suitable for all of us to meetup so that we could record a certain scene. This helped me improve my time management and negotiation skills (negotiate a period of time to film) and overall made us more organized. In the future, we would be more realistic on what date to record the scenes so that everyone can be present on that day. 

Tuesday, 13 August 2024

Location Scout and Risk Assessment

In this post, I select 4 locations and determine potential risks that may be involved when filming there. 


Location 1


Location 1

Location:

Regents Secondary School (classrooms)

Events in scene:

Interview with Bagus's Friends, happy pictures of Bagus
and his crush

Pros of location:

Easy to access, classroom aren't loud, clean, good lighting

Cons of location:

Some people might go into the classrooms unexpectedly, not all classrooms are empty (teacher might be present)

Alternatives:

Someone's living room

Risk Assessment 

Potential hazards:

The projector might fall off randomly and it could hit someone.

Evaluate risks: 

If the projector hit someone in the head, it would cause
brain injury and it could lead to memory loss.

Control measures:

We would prevent it by not touching the projector.

Responsibility:

We all will be in charge of the control measure to keep
everyone safe.

Time frame:

We would do the controlmeasure before we shoot the interviews
in the classroom.

Other notes:


Location 2


Location 2

Location:

My friend’s house

Events in scene:

Establishing shot of the house and Interviews will be done here

Pros of location:

The house has a dark surrounding with many windows that could be used to create sense of suspense

Cons of location:

The whole family lives there so loud noises aren’t recommended.

Alternatives:

Other friend's house

Risk Assessment 

Potential hazards:

Slippery floors, stairs are steep and the second floor is quite high up

Evaluate risks: 

People can get injured

Control measures:

Constant checkups just in case and warnings before we enter

Responsibility:

We will all be responsible of ourselves and since its our friend’s house then its mostly on him to keep the location safe

Time frame:

All the time since we'll be in a group and if somebody gets injured, medicine and other first aid kit can be found in the house

Other notes:


Location 3


Location 3

Location:

Kebun Raya Bedugul

Events in scene:

Pictures of Bagus with the girl being happy and then, he

will confess to the girl and get rejected

Pros of location:

It is a beautiful location that is suited for a confession to take place. The location is vast so we could shoot many variations of the scene and take advantage of the different surronding backgrounds (use the leaves for a more romatic mood).

Cons of location:

It is quite crowded at some period of time and it could potentially ruin the shot since some tourist might be in it. Also, Kebun Raya is far away so if we took a shot that we don't like, we would have to go to Kebun Raya again to reshoot.

Alternatives:

Renon Park

Risk Assessment 

Potential hazards:

A big branch might fall off from one of the tall

trees and hit someone's head

Evaluate risks: 

The concussion could lead to a braininjury and ppotentially causing

lossing consciousness

Control measures:

Stay away from unstable looking trees/tree branches.

Responsibility:

Everyone is in charge for the control measure since everyone is

responsible for their own safety. We could also remind each other of potential risk that might happen around the environment.

Time frame:

31st Agust 2024

Other notes:


Location 4


Location 4

Location:

Klungkung Red Bridge

Events in scene:

Bagus went out of the car with the girl and he got rejected by her

Pros of location:

Looks unique and aesthetic which it's a suitable location for a 
confession to take place. It's an open and wide space for us to easily record the scene.

Cons of location:

far from our homes so the way there is very time consuming, we also went past big, high speed traffic roads on the way which is very dangerous. Due to the earthquake threats of Indonesia recently, filming near the bridge will be very dangerous.

Alternatives:

Kebun Raya

Risk Assessment 

Potential hazards:

Possible crash on the road, possible

earthquakes and would create a tsunami that would greatly imapact us

since its close to the shore.

Evaluate risks: 

A crash could happen and the recording

would have to stop

Control measures:

We prevent these from happening by not recording in busy place.

Responsibility:

We would all be incharge of the control measures and be responsibe

for our own safety. If anyone is doing something dangerous,

we could remind them and discourage them from doing it.

Time frame:

1st September 2024

Other notes:


Self Reflection:
During the brainstorm session of thinking for potential ideas for the crime documentary, me and my team originally thought of 3 locations that would be suitable for our documentary. These locations were classrooms, my friend's house, and Kebun Raya. To assess the location futher, the location scout blog post that I made, helped us to evaluate whether if it was the right fit for the scenes and whether there weren't too many factors that could risk the safety of others at the location. After some more discussions and filming, we decided that we wouldn't be able to film at Kebun Raya because it was very far away from everyone. Also, there was an event at Klungkung where me and my team were invited which conveniently was near the Klungkung Red Bridge; so we took advantage of it and film it there instead. Next time, we would choose a location where it wasn't too far away but still suitable for the scenes.